
.png)

Practical Guide on Training Custom YOLO Model
- Dibyajyoti Jena
- Jan 28, 2021
- 5 min read

The YOLO architecture is very similar to any conventional CNN, but training YOLO from scratch for custom images is still a mystery for many. One of the reasons is the initial training dataset problem, we have to annotate each image for its bounding boxes. Then modify the configuration file according to the number of classes we are training for. This tutorial is the best for those who want to start out on YOLO without much coding experience or even knowledge of convolutional neural networks. We will train the model on Google colab and test it on our local system.
Before we begin, we have to understand that YOLO is a fully convolutional neural network, which means it has no dense layers. It detects objects in just one iteration and calculates coordinates of their bounding boxes as a regression task. Let’s get into the code and see how to get things working.
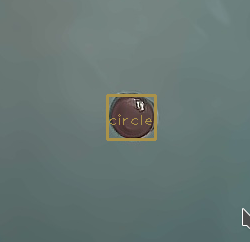
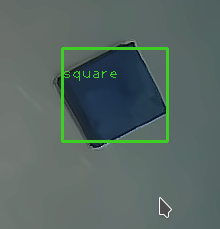
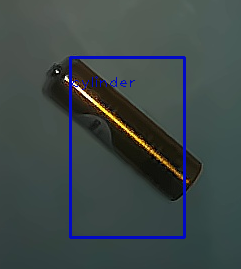
Problem statement: Suppose we have to classify 3 objects along with their bounding boxes.


Creating dataset (Difficulty *****):
First we have to create a dataset by annotating them and storing them all in one folder.
For Windows or Linux users, download and install LabelImg. Import the folder containing all images into the workspace. Make sure the yolo tag is on.If not, change from PascalVOC to yolo. We need to go through each image and draw a rectangular bounding box around the object. A .txt file containing the label and box coordinates is generated. Make sure the label is correct. Save the txt file in the same folder as the image file.
Repeat this for all the images. Since we will use yolo-tiny version, about 50 images in each class should be enough. There might be a label.txt file that gets generated too, delete it!
Zip the folder containing the images and their annotation text files, and upload it to your Google Drive under a yolov3 folder under the name image.zip.
Colab settings (Difficulty **):
Open a Colab notebook. Under Edit > Notebook settings, set Hardware accelerator as GPU.
Check if NVIDIA GPU is enabled with the following command in a code cell:
!nvidia-smiMost probably it will be a Tesla T4 GPU allocated.
Mount the Google Drive in which the zip file is stored with the following code:
from google.colab import drive
drive.mount('/content/gdrive')
!ln -s /content/gdrive/My\ Drive/ /mydrive
Go to the generated link, choose the correct drive, copy the generated code and paste the code where prompted. Hit enter to proceed.
Your Google drive is now mounted on the colab system. Clone Darknet yolo architecture into the colab system:
!git clone https://github.com/AlexeyAB/darknetCompile Darknet and enable OpenCV, GPU use:
%cd darknet
!sed -i 's/OPENCV=0/OPENCV=1/' Makefile
!sed -i 's/GPU=0/GPU=1/' Makefile
!sed -i 's/CUDNN=0/CUDNN=1/' Makefile
!make
Specify train, test files and class names
# My class names are cirle, square, cylinder
!echo "circle","square","cylinder"> data/obj.names
!echo -e 'classes= 3\ntrain  = data/train.txt\nvalid  = data/test.txt\nnames = data/obj.names\nbackup = /mydrive/yolov3' > data/obj.data
!mkdir data/obj
Check on the files button on the left dashboard, under Darknet > data there should be a ‘obj.names’ file. Double click on it and open it. If the class names are in a single row, change them to one row per name, ctrl + s to save.
Unzip images from Google Drive:
!unzip /content/gdrive/MyDrive/yolov3/image.zip -d data/objRe-label annotation text files
The annotation files have string labels in them. We need to convert them into numerical format.
import glob
import os
import re

txt_file_paths = glob.glob(r"/content/darknet/data/obj/image/*.txt")
for i, file_path in enumerate(txt_file_paths):
 # get image size
 with open(file_path, "r") as f_o:
       lines = f_o.readlines()
       text_converted = []
 for line in lines:
 print(line)
           numbers = re.findall("[0-9.]+", line)
 print(numbers)
 if numbers:
               text = "{} {} {} {} {}".format(numbers[0], numbers[1], numbers[2], numbers[3], numbers[4])
               text_converted.append(text)
 print(i,'class = ',num, file_path)
 print(text,'\n')
 # Write file
 with open(file_path, 'w') as fp:
 for item in text_converted:
               fp.writelines("%s\n" % item)
Just make sure, if there are three classes, the labels should be 0, 1 or 2, not something else. Change accordingly if that’s not the case.
Check images list and create train file
import glob
images_list = glob.glob("/content/darknet/data/obj/image/*.jpg")
print(images_list)
file = open("/content/darknet/data/train.txt", "w")
file.write("\n".join(images_list))
file.close()
Now our training files are set and ready to go.
Change configuration settings and train (Difficulty **):
We will train yolov3-tiny_obj for just 3 classes, where as it was initially configured for 80 classes. So we need to save some changes to the yolov3-tiny_obj.cfg file.
Under darknet > cfg, search for yolov3-tiny_obj.cfg and double click to open it on a right-sided panel. It has 13 convolutional layers and 2 yolo layers. Let’s go through the changes from the beginning.
The file starts with [net]
Comment out Training and Testing lines.
Since we will be training with the file here, comment out batch and subdivisions under Testing.
Change max_batches to 2000 x (number of classes), in this case: 6000
Under training change batch to 16 and subdivisions to 2, since we have only around 50 images per class. For larger datasets, try batch = 32, 64 and so on, similarly subdivisions = 4, 8 and so on. Ratio of batch/subdivisions = 8 works fine!
Change steps to 4000 and 5000, specifically for this case. At these steps, the learning rate will be multiplied by scales factor, overall there are no hard rules to defining these numbers, it is more a matter of intuition and logic.
Overall the initial 24 lines should look like this:
[net]
#Testing
#batch=1
#subdivisions=1
#Training
batch=16
subdivisions=2
width=416
height=416
channels=3
momentum=0.9
decay=0.0005
angle=0
saturation = 1.5
exposure = 1.5
hue=.1

learning_rate=0.001
burn_in=100
max_batches = 6000
policy=steps
steps=4000,5000
scales=.1,.1
Search for the yolo layers. (Look around lines 132 and 174 of the file)
In those layers, change the number of classes to 3 (or your custom classes).
Then go to their previous convolutional layer, change the filters according to this formula: (classes + 5) x 3. In this case, where classes = 3, filters = 24. Change filter number accordingly for both layers so that it looks something like this:
[convolutional]
size=1
stride=1
pad=1
filters=24
activation=linear

[yolo]
mask = 0,1,2
anchors = 10,14,  23,27,  37,58,  81,82,  135,169,  344,319
classes=3
num=6
jitter=.3
ignore_thresh = .7
truth_thresh = 1
random=1
Ctrl + s to save the file, then execute the following code cell to train the model.
!./darknet detector train data/obj.data cfg/yolov3-tiny_obj.cfg -dont_showIt will be a miracle if you get to train the model without any errors in the first go, congratulations! The training process with yolo-tiny should take less than half an hour with low traffic and about an hour with heavy traffic. Final weights file will be downloaded into the yolov3 folder in your drive which we created earlier.
Testing (Difficulty ***):
We have our trained model ready, let’s test the model now.
Create a python virtual environment and install open-cv for python.
Clone this github link into that folder, it contains a python file to run the model and the testing configuration file. Go through the python code and make changes according to your project where marked. Don’t touch other lines!
Run the python file and you should get results something like this:


Comments